Smt X Ray Inspection
The Dinghua X-Ray non-destructive testing instrument DH-X7 can be used in fields such as IC, BGA, CSP, semiconductors, SMT, DIP, lithium batteries, automotive parts, aluminum alloys, photovoltaics, molded plastics, and ceramics.
Description
Products Description
1.The X-ray source utilizes a sealed X-ray tube, featuring long service life and maintenance-free operation, with optional 90KV/110KV configurations.
2.The new-generation high-definition digital flat-panel detector, designed with high resolution, delivers optimal imaging in extremely short time.
3.Laser auto-navigation positioning enables quick selection of imaging locations.
4.X/Y/Z-axis motion control ensures convenient and user-friendly operation.
5.CNC inspection mode supports rapid automated inspection for multi-point arrays.
6.Adjustable tilt angle up to 60° allows multi-angle inspection, making it easier to detect sample defects.
7.A visual high-definition navigation window provides intuitive operation and quick localization of inspection targets.
8.Stage size: 450mm * 500mm.
9.Simple and fast operation for rapid defect identification, with mastery achievable after just two hours of training.
Application areas
1. X ray inspection for electronic components, such as various package types such as TC/BCM/SFV/ceramic substrates;
2. Semiconductor/SMT/UIP electronic component inspection, x ray machine for pcb;
3. X ray inspection system can be used for lithium battery testing
4. Inspection of automotive parts/pressure casting components
5. Inspection for special industries (photovoltaics/molded plastics/ceramics, etc.)
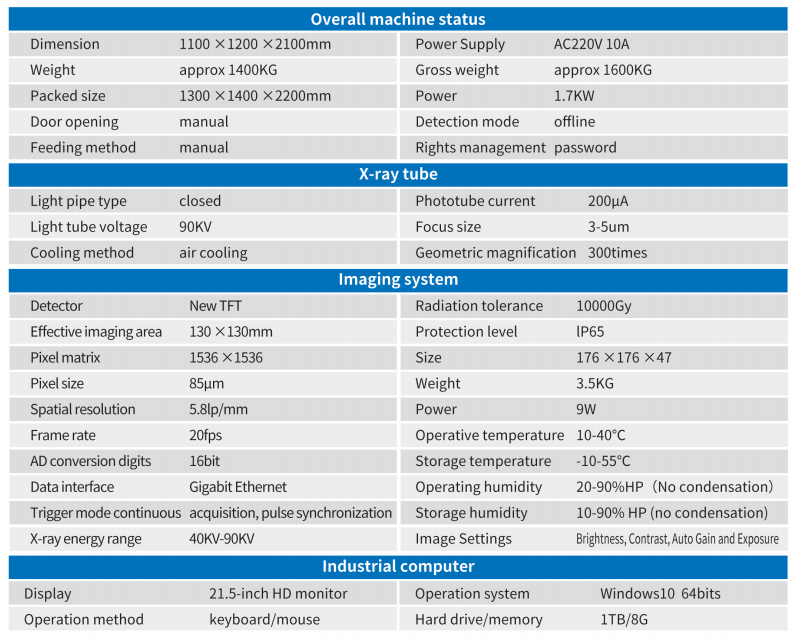
Technical parameters and specifications

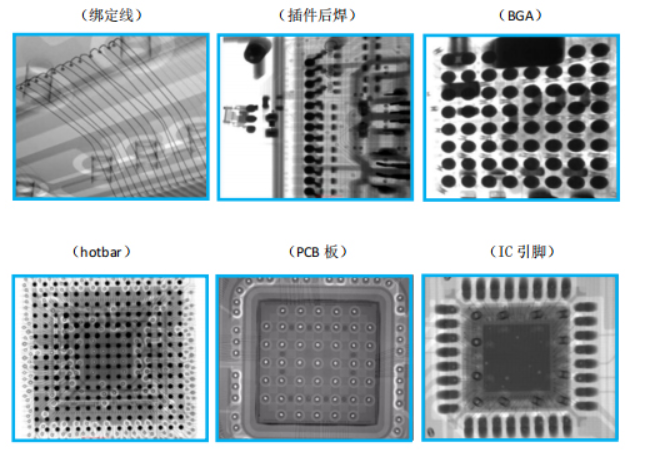
Detecting images

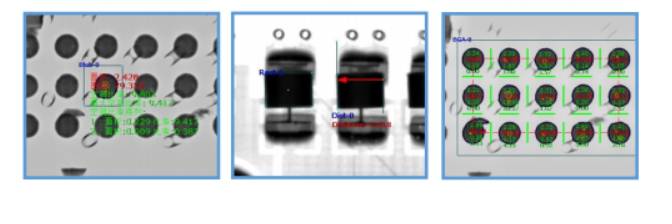
Detection and measurement
Bubble Rate Measurement
Automatic Calculation:Can measure bubbles of BGA and QFN packaged components, automatically calculate the bubble proportion in the selected area. You can set thresholds to automatically determine the void rate and maximum void rate.
Adjust Parameters:Adjust thresholds, size, Blob type, calculation parameters, etc. to get accurate results of automatic calculation.
Save Parameters:Users can save current bubble measurement parameters (thresholds, size, Blob type, calculation, etc.). These parameters can be directly reused when inspecting the same product next time, improving inspection efficiency.
Dimension Calculation
Filling Tin Ratio Calculation:Mainly used to measure the wetting rate of through-hole components. Obtain the proportion and height of the component's soldering surface via rectangular frame selection.
Quick Measurement:Get the distance between two points via arbitrary frame selection.
Angle:Click points A and B to set the baseline, then click point C to measure the included angle between rays BA and BC.
Circle:Mainly used to measure tin balls and other circular components. Select any circular component via frame selection to get its circumference, area and radius.
Horizontal Rectangle:Mainly used to measure square components. Select a square via frame selection to get its length, width and area.
Automatic Inspection
CNC Inspection:For multiple inspection points, just set any position and measurement items; the software will automatically capture each inspection point and save the images.
Laser Positioning:Red dot laser positioning, double assistance, easy navigation.
( Bubble Void Rate ) ( Distance ) ( CNC Inspection )


