Automatic Optical Reballing Machine Price
Automatic Optical Reballing Machine Price.
Ensure precise alignment of every soldering joint.
Infrared and hot air heating.
Laser positioning.
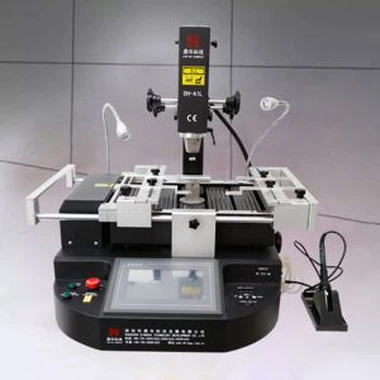
Description
Laser position Automatic Optical Reballing Machine Price
1. Product Features
• Semi automation. Top head can rise and decline automatically. Built-in Vacuum suction can place and pick up chips automatically
•High successful rate of repairing due to precise temperature control and precise alignment of every soldering joint.
•The upper and lower hot air heating,which can heat up at the same time from the top of he component to the bottom
•Temperature is controlled strictly. PCB won't crack or turn yellow because temperature rises gradually.
• Curves can be displayed with instant curve analysis function.


DH-G620 is totally same as DH-A2, automatically desoldering, pick-up, puting back and soldering for a chip, with optical alignment for mounting,no matter whether you have experience or not, you can master it in one hour.


2.Specification
| power | 5300W |
| Top heater | Hot air 1200W |
| Bottom heater | Hot air 1200W.Infrared 2700W |
| Power supply | AC220V±10% 50/60Hz |
| Dimension | L530*W670*H790 mm |
| Positioning | V-groove PCB support, and with external universal fixture |
| Temperature control | K type thermocouple, closed loop control, independent heating |
| Temperature accuracy | ±2℃ |
| PCB size | Max 450*490 mm,Min 22*22 mm |
| Workbench fine-tuning | ±15mm forward/backward,±15mm right/left |
| BGAchip | 80*80-1*1mm |
| Minimum chip spacing | 0.15mm |
| Temp Sensor | 1(optional) |
| Net weight | 70kg |
3.Details


4.Certificate
UL, E-MARK, CCC, FCC, CE ROHS certificates. Meanwhile, to improve and perfect the quality system,
Dinghua has passed ISO, GMP, FCCA, C-TPAT on-site audit certification.

6.Packing

7. Shipment of Automatic Optical Reballing Machine
Fast and safe DHL/TNT/UPS/FEDEX
Other shipment terms are acceptable if you need.

8. Payment terms for Automatic Optical Reballing Machine
Bank transfer, Western Union, Credit card.
Shipment will be arranged with 5-10 business after placing orders.
Contact us for Automatic Optical Reballing Machine Price
Welcome to visit our factory for business cooperation.
Please add leave a message, we will contact you as soon as possible
9. Related Knowledge About Motherboard Repair
1. Where is the Power SW connected to the motherboard?
The Power SW (Power Switch) refers to the power switch cable that connects to the power button on the computer chassis. Typically, it is connected to a row of panel connection pins located in the lower right corner of the motherboard. These pins correspond to various functions, such as the power switch, hard disk activity indicator, power indicator light, speaker, etc. Each pin is labeled with an English abbreviation on the motherboard.
If the specific labels are unclear, refer to the motherboard manual for guidance. Insert the Power SW cable into the appropriate pin based on the label. Note that the cable interface has a correct orientation. Ensure it is inserted in the correct direction to avoid damaging the pins or causing functionality issues.
2. Motherboard DRAM light is always on
If the DRAM light on the motherboard remains lit, it indicates that the motherboard is unable to read the memory correctly.
Two main causes for this issue are:
- Poor contact between the memory module and the motherboard slot, preventing proper recognition.
- Incompatible memory specifications, meaning the memory module does not match the motherboard's compatibility requirements.
To troubleshoot:
If the memory specifications are confirmed to be compatible with the motherboard, remove the memory module, clean the dust from the memory slot, and gently clean the memory's gold contacts using an eraser. Reinsert the memory module and restart the system.
If the issue persists, the memory module itself may be defective and require repair or replacement.
If the memory specifications are not compatible with the motherboard, replace the module with one that meets the compatibility requirements and reinsert it into the slot.